C++多线程编程
C++多线程编程
线程控制原语
函数原型:
std::thread threadname(_Callable&& __f,_Args&&... __args):创建一个线程类对象,传入线程执行函数作为thread类构造,threadname是自定义的1
2
3
4
5
6
7
8
9
10
11#include <thread>
std::thread threadname(_Callable&& __f,_Args&&... __args);
//注意:threadname是你要创建的线程对象名,自定义的
//参数
__f:新线程的执行函数;
__args:新线程执行函数所需的参数;void thread::join():线程类对象的成员方法,阻塞等待调用该函数的thread对象所绑定的子线程退出1
2
3
4
5
6
7
8
9
10
11
12
13
14
15
16
17
18
19
20
21
22
23
24
25
26
27
28
29
30
31
32
33
34//函数源码
void
thread::join()
{
int __e = EINVAL;
if (_M_id != id())
__e = __gthread_join(_M_id._M_thread, 0);
if (__e)
__throw_system_error(__e);
_M_id = id();
}
//使用示例
#include <iostream>
#include <string>
#include <thread>
//使用方法
void print(std::string msg){
std::cout<<msg<<std::endl;
}
int main (int argc, char *argv[]) {
std::thread t(print,"hello world");
t.join(); //等待子线程t执行结束
return 0;
}void thread::detach():线程类对象的成员方法,将调用该函数的thread对象所绑定的线程与主线程分离1
2
3
4
5
6
7
8
9
10
11
12
13
14
15
16
17
18
19
20
21
22
23
24
25
26
27
28
29
30
31//函数源码
void
thread::detach()
{
int __e = EINVAL;
if (_M_id != id())
__e = __gthread_detach(_M_id._M_thread);
if (__e)
__throw_system_error(__e);
_M_id = id();
}
//使用示例
#include <iostream>
#include <string>
#include <thread>
void print(std::string msg){
std::cout<<msg<<std::endl;
}
//使用方法
int main (int argc, char *argv[]) {
std::thread t(print,"hello world");
t.detach(); //将线程t与主线程分离,这样主线程结束,子线程t依然执行
return 0;
}bool thread::joinable():线程类对象的成员方法,判断线程是否可以join或者detach方法1
2
3
4
5
6
7
8
9//函数源码
bool
joinable() const noexcept
{ return !(_M_id == id()); }
//返回值
0:不可以调用;
1:可以调用;std::thread::id thread::get_id():线程类对象的成员方法,返回该线程对象的线程ID1
2
3
4
5
6
7
8
9
10
11
12
13//函数源码
id get_id() const noexcept
{ return _M_id; }
using native_handle_type=__gthread_t;
typedef pthread_t __gthread_t;
typedef unsigned long int pthread_t;
class id{
native_handle_type _M_thread;
}
//id是thread类中的成员类,实际上就是pthread_t也就是unsigned long int类型std::thread::id std::this_thread::get_id():可以直接调用这个用来获thread::id取当前线程ID1
2
3
4
5
6
7
8
9
10
11inline thread::id
get_id() noexcept
{
#ifndef _GLIBCXX_HAS_GTHREADS
return thread::id(1);
#elif defined _GLIBCXX_NATIVE_THREAD_ID
return thread::id(_GLIBCXX_NATIVE_THREAD_ID);
#else
return thread::id(__gthread_self());
#endif
}void std::this_thread::sleep_for(time):用来让线程睡眠的函数1
2
3
4
5
6
7
8
9
10
11
12
13
14
15
16
17
18
19
20
21
22
23
24
25
26
27
28
29
30
31
32
33
34
35
36
37
38
39
40
41
42
43
44
45
46
47//函数原型
template<typename _Rep, typename _Period>
inline void
sleep_for(const chrono::duration<_Rep, _Period>& __rtime)
{
if (__rtime <= __rtime.zero())
return;
auto __s = chrono::duration_cast<chrono::seconds>(__rtime);
auto __ns = chrono::duration_cast<chrono::nanoseconds>(__rtime - __s);
#ifdef _GLIBCXX_USE_NANOSLEEP
struct ::timespec __ts =
{
static_cast<std::time_t>(__s.count()),
static_cast<long>(__ns.count())
};
while (::nanosleep(&__ts, &__ts) == -1 && errno == EINTR)
{ }
#else
__sleep_for(__s, __ns);
#endif
}
//参数列表:
__rtime:要设定的睡眠时间,是一个chrono对象,可以通过chrono中的nanoseconds设置纳秒,milliseconds设置毫秒,seconds设置秒数,minutes设置分钟,hours设置小时数;
注意:c++14可以直接带上单位表示要设定的睡眠时间单位
//使用示例:
void foo(){
std::cout<<"线程函数foo执行"<<std::endl;
//睡眠10s
//c++11
std::this_thread::sleep_for(std::chrono::seconds(10));
//c++14
std::this_thread::sleep_for(10s);
}
int main(){
std::thread th(foo);
if(th.joinable()){
th.join();
}
return 0;
}
数据未定义错误
传递临时变量问题:问题:当我们在创建线程对象时,将临时变量作为线程函数参数传入,而我们的线程函数又需要的是引用类型对参数进行操作时,这将会导致线程函数执行时因临时变量被销毁,从而导致未定义行为解决方案:将临时变量复制到一个持久的对象中,再将变量的引用传递给线程函数,这里需要对变量执行std::ref操作,涉及的问题就是thread的构造函数是一个模板函数,作为一个中转站而造成的数据推导不正确的错误,具体请见关于std::ref函数
1
2
3
4
5
6
7
8
9
10
11
12
13
14
15
16
17
18
19
20
21
22
23
24
25//问题示例代码
#include <iostream>
#include <thread>
void foo(int& x) {
x += 1;
}
int main() {
std::thread t(foo, 1); // 传递临时变量
t.join();
return 0;
}
//解决方案
#include <iostream>
#include <thread>
void foo(int& x) {
x += 1;
}
int main() {
//因为主线程比子线程晚退出,所以当前局部变量x可以是一个持久对象
int x = 1; // 将变量复制到一个持久的对象中,但是是一个局部变量!
std::thread t(foo, std::ref(x)); // 将变量的引用传递给线程
t.join();
return 0;
}传递指针或引用指向局部变量问题:问题:当我们进行创建线程对象时,将指针或引用指向的局部变量作为线程函数参数传入时,会导致线程函数执行时,指针或引用指向的局部变量被销毁,从而导致未定义错误解决方案:将指针或引用指向堆上的变量,或使用std::shared_ptr等智能指针来管理对象的生命周期
1
2
3
4
5
6
7
8
9
10
11
12
13
14
15
16
17
18
19
20
21
22
23
24
25
26//问题示例代码
#include <iostream>
#include <thread>
void foo(int* ptr) {
std::cout << *ptr << std::endl; // 访问已经被销毁的指针
}
int main() {
int x = 1;
std::thread t(foo, &x); // 传递指向局部变量的指针
t.join();
return 0;
}
//解决方案
#include <iostream>
#include <thread>
void foo(int* ptr) {
std::cout << *ptr << std::endl;
delete ptr; // 在使用完指针后,需要手动释放内存
}
int main() {
int* ptr = new int(1); // 在堆上分配一个整数变量
std::thread t(foo, ptr); // 将指针传递给线程
t.join();
return 0;
}传递指针或引用指向已释放的内存问题:问题:当我们进行创建线程对象时,将指针或引用指向已释放或即将释放的内存的变量作为参数传入到线程函数中,会导致线程函数执行时,访问不到参数指向的内存,从而导致未定义错误。解决方案:这个问题其实包含了以上两种问题,根据以上两种问题解决方法,可以总结出的解决方案就是将传入参数变量的被销毁或释放时间比线程函数的生命周期结束时晚即可,例如下面代码案例
1
2
3
4
5
6
7
8
9
10
11
12
13
14
15
16
17
18
19
20
21
22
23
24
25
26
27//问题示例代码
#include <iostream>
#include <thread>
void foo(int& x) {
std::cout << x << std::endl; // 访问已经被释放的内存
}
int main() {
int* ptr = new int(1);
std::thread t(foo, *ptr); // 传递已经释放的内存
delete ptr;
t.join();
return 0;
}
//解决方案
#include <iostream>
#include <thread>
void foo(int& x) {
std::cout << x << std::endl;
}
int main() {
int x = 1; //主线程比子线程晚退出,就间接让变量x的释放或销毁事件晚于子线程被销毁时间
std::thread t(foo, std::ref(x)); // 将变量的引用传递给线程
t.join();
return 0;
}类成员方法作为入口函数,类对象被提前释放问题:问题:当我们创建线程对象时,将类成员方法作为线程函数,而类对象在线程函数执行完被释放,这会导致程序崩溃或者产生未定义的行为解决方案:可以使用std::shared_ptr来管理类对象的生命周期,确保在线程函数执行期间对象不会被销毁
1
2
3
4
5
6
7
8
9
10
11
12
13
14
15
16
17
18
19
20
21
22
23
24
25
26
27
28
29
30
31
32
33
34
35
36
37
38
39
40
41
42
43
44
45
46//问题示例代码
#include <iostream>
#include <thread>
class MyClass {
public:
void func() {
std::cout << "Thread " << std::this_thread::get_id()
<< " started" << std::endl;
// do some work
std::cout << "Thread " << std::this_thread::get_id()
<< " finished" << std::endl;
}
};
int main() {
MyClass obj;
std::thread t(&MyClass::func, &obj);
// obj 被提前销毁了,会导致未定义的行为
return 0;
}
//解决方案
#include <iostream>
#include <thread>
#include <memory>
class MyClass {
public:
void func() {
std::cout << "Thread " << std::this_thread::get_id()
<< " started" << std::endl;
// do some work
std::cout << "Thread " << std::this_thread::get_id()
<< " finished" << std::endl;
}
};
int main() {
std::shared_ptr<MyClass> obj = std::make_shared<MyClass>();
std::thread t(&MyClass::func, obj);
t.join();
return 0;
}类的私有成员方法作为入口函数问题:问题:当我们创建线程对象时,将类的私有成员方法作为线程函数,因为私有的问题,将会导致线程无法访问线程函数,从而导致未定义错误解决方案:将类的私有成员方法定义为类的友元函数
1
2
3
4
5
6
7
8
9
10
11
12
13
14
15
16
17
18
19
20
21
22
23
24
25
26
27
28
29
30
31
32
33
34
35
36
37
38
39
40
41
42
43
44
45
46
47//问题示例代码
#include <iostream>
#include <thread>
class MyClass {
private:
void privateFunc(){
std::cout << "Thread "
<< std::this_thread::get_id() << " privateFunc" << std::endl;
}
};
void myThreadFunc(MyClass* obj) {
obj->privateFunc();
}
int main() {
MyClass obj;
std::thread thread_1(myThreadFunc, &obj);
thread_1.join();
return 0;
}
//解决方案
#include <iostream>
#include <thread>
class MyClass {
private:
friend void myThreadFunc(MyClass* obj);
void privateFunc(){
std::cout << "Thread "
<< std::this_thread::get_id() << " privateFunc" << std::endl;
}
};
void myThreadFunc(MyClass* obj) {
obj->privateFunc();
}
int main() {
MyClass obj;
std::thread thread_1(myThreadFunc, &obj);
thread_1.join();
return 0;
}
线程同步
互斥锁(互斥量)
概念:
互斥锁mutex:用于解决多线程中数据共享问题以及实现线程同步,具体可见Linux系统编程-线程同步- 当多个线程都共享并且访问操作一个公共资源时,可能会发生多线程同时访问操作,导致数据的不正确性或者混乱
函数原型:
std::mutex mutex_name:**定义锁(创建锁)**,mutex_name是自定义锁名1
2
3
4#include <mutex>
std::mutex mx;void mutex::lock():mutex类成员方法,用于加锁,阻塞等待锁资源1
2
3
4
5
6
7
8#include <mutex>
std::mutex mx;
int main(){
//加锁
mx.lock();
}void mutex::unlock():mutex类成员方法,用于解锁1
2
3
4
5
6
7
8
9
10
11#include <mutex>
std::mutex mx;
int main(){
//加锁
mx.lock();
//do some things
//解锁
mx.unlock();
}bool mutex::try_lock():尝试加锁,加锁成功返回true,反之返回false1
2
3
4
5
6
7
8
9
10
11
12
13
14#include <mutex>
#include <iostream>
std::mutex mx;
int main(){
if(!mx.try_lock()){
std::cout<<"加锁失败"<<std::endl;
}
std::cout<<"加锁成功"<<std::endl;
mx.unlock();
return 0;
}
互斥锁的一些坑:
问题:当我们需要多线程不断地按顺序抢占并使用公共资源时,我们会为公共资源进行加锁,但是因为一个线程在解锁之后通过循环又自己加锁的时间过于短暂,并且操作系统并非实时更新没有立刻将资源释放掉,导致出现有一个线程一直占据公共资源的情况。
出现问题代码:
1 | |
解决方案:导致这种情况的发生是因为我们并没有给操作系统留够时间,让它更新释放资源,所以我们只需要在解锁之后加个休眠即可
解决代码:
1 | |
死锁
概念:
- 死锁是一种使用锁不恰当导致的现象,并不是一把锁
产生情况:
- 对一个锁反复lock
- 两个线程,线程1持有A锁,请求B锁,线程2持有B锁,请求A锁,导致死循环
超时锁
概念:
超时锁(timed_mutex):是一个可以设置时间的互斥锁- 超时锁拥有互斥锁的所有成员函数
- 超时锁可以适用于调试代码,查看线程竞争状态
函数原型:
std::timed_mutex mutexname:定义/创建一把超时锁1
2
3
4#include <mutex>
//tmx为锁名
std::timed_mutex tmx;bool timed_mutex::try_lock_for(time):为尝试加锁设置一个时间,当在时间之内加锁成功返回true,反之则返回false表示尝试加锁超时(失败)1
2
3
4
5
6
7
8
9
10
11
12
13
14
15
16
17
18
19
20
21
22
23
24
25
26
27
28
29
30
31
32
33//函数源码
template<typename _Rep, typename _Period>
bool
_M_try_lock_for(const chrono::duration<_Rep, _Period>& __rtime)
{
#if _GLIBCXX_USE_PTHREAD_MUTEX_CLOCKLOCK
using __clock = chrono::steady_clock;
#else
using __clock = chrono::system_clock;
#endif
auto __rt = chrono::duration_cast<__clock::duration>(__rtime);
if (ratio_greater<__clock::period, _Period>())
++__rt;
return _M_try_lock_until(__clock::now() + __rt);
}
//参数列表:
__rtime:要设定的睡眠时间,是一个chrono对象,可以通过chrono中的nanoseconds设置纳秒,milliseconds设置毫秒,seconds设置秒数,minutes设置分钟,hours设置小时数;
//使用示例
std::timed_mutex tmx;
void foo(int i){
for(;;){
if(!tmx.try_lock_for(std::chrono::seconds(1))){
continue;
}
std::cout<<i<<"[in]"<<std::endl;
sleep(1);
tmx.unlock();
}
}bool timed_mutex::try_lock_until(time):为尝试加锁设置一个期限(也就是一个起始时间+等待时间等于目标时间),当在期限之内加锁成功返回true(也就是加锁成功时间小于目标时间),反之则返回false表示尝试加锁超时(失败)1
2
3
4
5
6
7
8
9
10
11
12
13
14
15
16
17
18
19
20
21
22
23
24
25
26
27
28
29
30
31
32
33
34
35
36
37
38//函数源码
template<typename _Duration>
bool
_M_try_lock_until(const chrono::time_point<chrono::system_clock,
_Duration>& __atime)
{
auto __s = chrono::time_point_cast<chrono::seconds>(__atime);
auto __ns = chrono::duration_cast<chrono::nanoseconds>(__atime - __s);
__gthread_time_t __ts = {
static_cast<std::time_t>(__s.time_since_epoch().count()),
static_cast<long>(__ns.count())
};
return static_cast<_Derived*>(this)->_M_timedlock(__ts);
}
//参数列表
__atime:目标时间,使用;
//使用示例
void foo(int i){
for(;;){
if(!tmx.try_lock_until(std::chrono::system_clock::now()+std::chrono::seconds(1))){
continue;
}
/*
//等价于
if(!tmx.try_lock_for(std::chrono::seconds(1))){
continue;
}*/
std::cout<<i<<"[in]"<<std::endl;
sleep(1);
tmx.unlock();
}
}
注意:超时锁拥有互斥锁的所有成员函数,上面只展示互斥锁没有的成员函数
递归锁
概念:
递归锁(recursive_mutex):是一种在锁已被持有的情况下,允许同一线程对该锁进行多次加锁的机制,也叫可重入锁- 在一些业务场景下,线程需要在获取锁后还会多次获取该锁,为了避免出现死锁或者程序崩溃异常,可以使用递归锁来解决
- 递归锁适用于组合业务(用到同一个锁)
与互斥锁区别:唯一的区别就是递归锁可重入,实质就是计数器,lock()计数器+1,unlock()计数器-1
补充:还有一个递归超时锁recursive_timed_mutex,在递归锁的机制加上了超时机制,跟超时锁的成员方法一样,只是具体实现不同
函数原型:
std::recursive_mutex rmx:定义/创建递归锁1
2
3
4#include <mutex>
//rmx为自己定义的递归锁名
std::recursive_mutex rmx;void recursive_mutex::lock():用于加锁1
2
3
4
5
6
7
8#include <mutex>
std::recursive_mutex rmx;
int main(){
//加锁
rmx.lock();
}void recursive_mutex::unlock():用于解锁1
2
3
4
5
6
7
8
9
10
11#include <mutex>
std::recursive_mutex rmx;
int main(){
//加锁
rmx.lock();
//do some things
//解锁
rmx.unlock();
}bool recursive_mutex::try_lock():尝试加锁,加锁成功返回true,反之返回false1
2
3
4
5
6
7
8
9
10
11
12
13
14#include <mutex>
#include <iostream>
std::recursive_mutex rmx;
int main(){
if(!rmx.try_lock()){
std::cout<<"加锁失败"<<std::endl;
}
std::cout<<"加锁成功"<<std::endl;
rmx.unlock();
return 0;
}
注意:互斥锁和递归锁拥有同样的成员方法,唯一不同就是递归锁的成员方法实现与互斥锁不同
共享锁(读写锁)
概念:
共享锁:是一把读时共享资源,写时互斥(独占)机制的锁,也叫做读写锁- 以读方式给数据加锁 称之为读锁
- 以写方式给数据加锁 称之为写锁
特性:
- 锁只有一把
- 写锁优先级高
- 写独占,读共享
读写锁使用特性:
- 读写锁是”写模式加锁”时,解锁前,所有对该锁加锁的线程都会被阻塞
- 读写锁是”读模式加锁”时,如果线程以读模式对其加锁会成功;如果线程以写模式对其加锁会阻塞
- 读写锁是”读模式加锁”时,既有试图以写模式加锁的线程,也有试图以读模式加锁的线程,那么读写锁会阻塞随后的读模式加锁请求。优先满足写模式锁。
读锁、写锁并行阻塞,写锁优先级高。 - 读写锁非常适合对于数据结构读的次数大于写的情况
函数原型:
std::shared_mutex smx:定义/创建共享锁1
2
3
4#include <shared_mutex>
//smx是自己定义的共享锁名
std::shared_mutex smx;void shared_mutex::lock_shared():阻塞等待获取读锁(共享锁)并进行加锁1
2
3
4
5
6
7
8
9
10#include <shared_mutex>
std::shared_mutex smx;
void Foo(){
smx.lock_shared(); //读锁加锁
std::cout<<"读锁(共享锁)加锁成功"<<std::endl;
smx.unlock_shared();
}void shared_mutex::unlock_shared():用于读锁(共享锁)解锁1
2
3
4
5
6
7
8
9
10#include <shared_mutex>
std::shared_mutex smx;
void Foo(){
smx.lock_shared();
std::cout<<"读锁(共享锁)加锁成功"<<std::endl;
smx.unlock_shared(); //读锁解锁
}void shared_mutex::lock():用于阻塞等待获取写锁(互斥锁)并加锁1
2
3
4
5
6
7
8
9
10#include <shared_mutex>
std::shared_mutex smx;
void Foo(){
smx.lock(); //写锁加锁
std::cout<<"写锁(互斥锁)加锁成功"<<std::endl;
smx.unlock();
}void shared_mutex::unlock():用于写锁(互斥锁)解锁1
2
3
4
5
6
7
8
9
10#include <shared_mutex>
std::shared_mutex smx;
void Foo(){
smx.lock();
std::cout<<"写锁(互斥锁)加锁成功"<<std::endl;
smx.unlock(); //写锁解锁
}bool shared_mutex::try_lock_shared():尝试获取读锁(共享锁)并加锁,成功返回true,否则返回false1
2
3
4
5
6
7
8
9
10
11
12#include <shared_mutex>
std::shared_mutex smx;
void Foo(){
if(!smx.try_lock_shared()){
std::cout<<"读锁(共享锁)尝试加锁失败"<<std::endl;
}
std::cout<<"读锁(共享锁)加锁成功"<<std::endl;
smx.unlock_shared();
}bool shared_mutex::try_lock():尝试获取写锁(互斥锁)并加锁1
2
3
4
5
6
7
8
9
10
11
12#include <shared_mutex>
std::shared_mutex smx;
void Foo(){
if(!smx.try_lock()){
std::cout<<"写锁(互斥锁)尝试加锁失败"<<std::endl;
}
std::cout<<"写锁(互斥锁)加锁成功"<<std::endl;
smx.unlock();
}
lock_guard类
概念:
std::lock_guard是 C++ 标准库中的一种互斥量封装类,用于保护共享数据,防止多个线程同时访问同一资源而导致的数据竞争问题,自动对绑定的锁进行自动加解锁操作特性:- 当lock_guard类的构造函数被调用时,绑定的互斥锁锁定
- 当lock_guard类的析构函数被调用时,绑定的互斥锁解锁
std::lock_guard对象不能复制或移动,因此它只能在局部作用域中使用不支持临时解锁,也就是当未出栈区也就是类对象生命未结束之前,我们不能手动解锁禁止隐式转换
因为lock_guard利用的类对象生命周期结束调用析构函数进行解锁的,我们可以使用
{}来进行控制临界区以及lock_guard的释放
源码:
1 | |
使用案例:
1 | |
unique_lock类
概念:
std::unique_lock是 C++11 标准库中的一种互斥量封装类,以独占模式管理锁资源,提供的方法比较多,能够比lock_guard更灵活地管理锁,同样的也拥有自动加解锁的功能特性:- std::unique_lock正常自动加锁以及解锁
std::unique_lock对象是可移动的,能够移动构造以及赋值支持多种构造函数,例如延迟加锁,尝试加锁等支持临时释放锁,在unique_lock对象生命周期结束前,可以手动释放锁,释放后也可以重新加锁禁止隐式转换- 提供多种成员方法
源码:
1 | |
常用函数和方法:
explicit unique_lock(mutex_type& __m):构造函数,使用给定的互斥量 __m 进行初始化,并对该互斥量进行加锁操作,出栈调用析构函数进行释放锁1
2
3
4
5
6
7
8
9
10#include <mutex>
//unique_lock构造函数,explicit关键字是禁止隐式转换也就是需要传入参数的类型与我们传入的变量类型一致
//将传入的锁赋值给类成员_M_device,_M_owns默认赋值为false,然后进行加锁,_M_owns变为true
explicit unique_lock(mutex_type& __m)
: _M_device(std::__addressof(__m)), _M_owns(false)
{
lock();
_M_owns = true;
}unique_lock(mutex_type& __m, defer_lock_t) noexcept:构造函数,延迟加锁构造,使用给定的互斥量 __m 进行初始化,不进行加锁操作,手动进行加锁,出栈判断是否加锁来判断是否释放锁1
2
3
4
5
6
7#include <mutex>
//重载的unique_lock构造函数,需多传入一个defer_lock变量
//可以延迟加锁,也就是可以先不加锁,在后面手动加锁,当类对象出栈区也就是类对象生命周期结束时,加锁了则释放锁,没加锁则不释放
unique_lock(mutex_type& __m, defer_lock_t) noexcept
: _M_device(std::__addressof(__m)), _M_owns(false)
{ }unique_lock(mutex_type& __m, try_to_lock_t) noexcept:构造函数,不阻塞地尝试加锁构造,使用给定的互斥量 __m 进行初始化,并尝试对该互斥量进行加锁操作。如果加锁失败,则创建的unique_lock对象不与任何互斥量关联1
2
3
4
5
6
7
8#include <mutex>
//重载的unique_lock构造函数,需多传入一个try_to_lock变量
//不阻塞地尝试加锁,_M_owns根据try_lock()的返回结果决定,成功则拥有锁,出栈区释放锁,不成功则unique_lock对象没有与互斥量关联,出栈区不进行释放锁
unique_lock(mutex_type& __m, try_to_lock_t)
: _M_device(std::__addressof(__m)), _M_owns(_M_device->try_lock())
{ }unique_lock(mutex_type& __m, adopt_lock_t) noexcept:构造函数,使用给定的互斥量 __m 进行初始化,默认已经拥有锁则不进行加锁操作,出栈释放锁1
2
3
4
5
6
7
8
9#include <mutex>
//重载的unique_lock构造函数,需多传入一个adopt_lock变量
//默认已经拥有锁,所以不加锁,出栈区则释放锁
unique_lock(mutex_type& __m, adopt_lock_t) noexcept
: _M_device(std::__addressof(__m)), _M_owns(true)
{
// XXX calling thread owns mutex
}void lock():加锁操作,阻塞等待锁资源1
2
3
4
5
6
7
8
9
10
11
12
13
14
15
16
17#include <mutex>
//加锁操作
//判断锁是否存在,判断是否拥有锁,存在则抛出错误,拥有则抛出异常,都没有就进行加锁
void
lock()
{
if (!_M_device)
__throw_system_error(int(errc::operation_not_permitted));
else if (_M_owns)
__throw_system_error(int(errc::resource_deadlock_would_occur));
else
{
_M_device->lock();
_M_owns = true;
}
}bool try_lock():尝试加锁,加锁成功返回true,反之返回false1
2
3
4
5
6
7
8
9
10
11
12
13
14
15
16
17
18#include <mutex>
//尝试加锁操作
//判断锁是否存在,判断是否拥有锁,存在则抛出错误,拥有则抛出异常,都没有就进行尝试加锁
_GLIBCXX_NODISCARD
bool
try_lock()
{
if (!_M_device)
__throw_system_error(int(errc::operation_not_permitted));
else if (_M_owns)
__throw_system_error(int(errc::resource_deadlock_would_occur));
else
{
_M_owns = _M_device->try_lock();
return _M_owns;
}
}bool try_lock_for(const chrono::duration<_Rep, _Period>& __rtime):为尝试加锁设置一个时间,当在时间之内加锁成功返回true,反之则返回false表示尝试加锁超时(失败)1
2
3
4
5
6
7
8
9
10
11
12
13
14
15
16
17
18
19
20
21
22
23#include <mutex>
//阻塞地尝试在指定持续时间内加锁操作
//判断锁是否存在,判断是否拥有锁,存在则抛出错误,拥有则抛出异常,都没有就进行try_lock_for
template<typename _Rep, typename _Period>
_GLIBCXX_NODISCARD
bool
try_lock_for(const chrono::duration<_Rep, _Period>& __rtime)
{
if (!_M_device)
__throw_system_error(int(errc::operation_not_permitted));
else if (_M_owns)
__throw_system_error(int(errc::resource_deadlock_would_occur));
else
{
_M_owns = _M_device->try_lock_for(__rtime);
return _M_owns;
}
}
//参数
chrono对象:持续时间;
_Rep 和 _Period:分别表示持续时间的数值类型和时间单位;bool try_lock_until(const chrono::time_point<_Clock, _Duration>& __atime):为尝试加锁设置一个期限(也就是一个起始时间+等待时间等于目标时间),当在期限之内加锁成功返回true(也就是加锁成功时间小于目标时间),反之则返回false表示尝试加锁超时(失败)1
2
3
4
5
6
7
8
9
10
11
12
13
14
15
16
17
18
19
20
21
22
23#include <mutex>
//阻塞地尝试在指定时间点之前加锁操作
//判断锁是否存在,判断是否拥有锁,存在则抛出错误,拥有则抛出异常,都没有就进行try_lock_until
template<typename _Clock, typename _Duration>
_GLIBCXX_NODISCARD
bool
try_lock_until(const chrono::time_point<_Clock, _Duration>& __atime)
{
if (!_M_device)
__throw_system_error(int(errc::operation_not_permitted));
else if (_M_owns)
__throw_system_errodui xaingr(int(errc::resource_deadlock_would_occur));
else
{
_M_owns = _M_device->try_lock_until(__atime);
return _M_owns;
}
}
//参数
chrono对象:时间点;
_Clock 和 _Duration:分别表示时间点类型和持续时间类型;void unlock():解锁操作1
2
3
4
5
6
7
8
9
10
11
12
13
14
15#include <mutex>
//解锁操作
//判断是否拥有锁,拥有则释放锁,没有则不释放
void
unlock()
{
if (!_M_owns)
__throw_system_error(int(errc::operation_not_permitted));
else if (_M_device)
{
_M_device->unlock();
_M_owns = false;
}
}
lock函数与scoped_lock类
概念:
- 为了
避免死锁,在c++11和c++17都推出一种解决方案,分别为lock函数和scoped_lock类 lock函数:可以同时锁住传入的多个锁scoped_lock类:用于多个互斥体的免死锁RAII封装类
区别:
lock函数:只完成加锁动作,并不会自动释放锁scoped_lock类:相比较lock函数,scoped_lock类对象会在出栈时调用析构函数,对加的所有锁进行释放
使用:
void lock(_L1& __l1,_L2& __l2,_L3&... __l3):对多个传入的锁进行加锁,阻塞等待所有的锁都加锁成功1
2
3
4
5
6
7
8
9
10
11
12
13
14
15
16
17
18
19
20
21
22
23
24
25
26
27
28
29
30
31
32
33
34
35
36
37
38
39
40
41#include <mutex>
//函数原型
template<typename _L1, typename _L2, typename... _L3>
//在函数体内对传入的锁进行循环加锁
void
lock(_L1& __l1, _L2& __l2, _L3&... __l3)
{
#if __cplusplus >= 201703L
if constexpr (is_same_v<_L1, _L2> && (is_same_v<_L1, _L3> && ...))
{
constexpr int _Np = 2 + sizeof...(_L3);
unique_lock<_L1> __locks[] = {
{__l1, defer_lock}, {__l2, defer_lock}, {__l3, defer_lock}...
};
int __first = 0;
do {
__locks[__first].lock();
for (int __j = 1; __j < _Np; ++__j)
{
const int __idx = (__first + __j) % _Np;
if (!__locks[__idx].try_lock())
{
for (int __k = __j; __k != 0; --__k)
__locks[(__first + __k - 1) % _Np].unlock();
__first = __idx;
break;
}
}
} while (!__locks[__first].owns_lock());
for (auto& __l : __locks)
__l.release();
}
else
#endif
{
int __i = 0;
__detail::__lock_impl(__i, 0, __l1, __l2, __l3...);
}
}scoped_lock(_MutexTypes&... __m):对传入的锁全部加锁,阻塞等待所有的锁都加锁成功,当出栈时调用析构函数将所有锁释放掉1
2
3
4
5
6
7
8
9
10
11
12
13
14
15
16
17
18
19
20
21
22//函数原型
template<typename... _MutexTypes>
//实质上调用了lock函数,释放则遍历释放
class scoped_lock
{
public:
explicit scoped_lock(_MutexTypes&... __m) : _M_devices(std::tie(__m...))
{ std::lock(__m...); }
explicit scoped_lock(adopt_lock_t, _MutexTypes&... __m) noexcept
: _M_devices(std::tie(__m...))
{ } // calling thread owns mutex
~scoped_lock()
{ std::apply([](auto&... __m) { (__m.unlock(), ...); }, _M_devices); }
scoped_lock(const scoped_lock&) = delete;
scoped_lock& operator=(const scoped_lock&) = delete;
private:
tuple<_MutexTypes&...> _M_devices;
};
条件变量
概念:
条件变量condition_variable:能够使线程阻塞等待特定条件发生后,执行操作,利用”等待->唤醒”的机制,使得多线程同步- 相比较线程循环等待条件发生,阻塞等待条件的发生将线程唤醒,能够避免占用cpu资源
条件变量通常需要结合互斥锁使用来达到线程同步使用场景:条件变量也被常用于生产者与消费者模型中
注意:在condition_variable中,我们传入的锁参数都需要是一个unique_lock对象才行
条件变量使用步骤:
- 创建一个condition_variable对象
- 创建一个mutex对象,用于保护临界区
- 用unique_lock对象管理创建的mutex对象
- 在需要等待特定条件实现的地方,使用wait()、wait_for()或wait_until()进行等待被唤醒
- 在特定条件实现的地方,使用notify_one()或notify_all()唤醒一个或全部阻塞在该条件变量的线程
函数原型
condition_variable cv:构造函数,声明一个条件变量cvvoid wait(unique_lock<mutex>& __lock):阻塞等待特定条件发生,并且会先释放拥有的锁,当被唤醒时,解除阻塞重新加锁1
2
3
4
5
6
7
8
9
10
11
12
13
14
15
16
17
18
19
20
21
22
23
24
25
26
27
28
29
30
31
32
33
34
35
36#include <condition_variable>
#include <iostream>
#include <mutex>
#include <thread>
std::condition_variable p;
std::mutex mx;
int x=10;
void foo1(){
std::unique_lock<std::mutex> ul(mx);
//阻塞等待唤醒
p.wait(ul);
printf("x=%d\n",x);
x++;
}
void foo2(){
std::unique_lock<std::mutex> ul(mx);
while (x--) {
if(x==0){
p.notify_one();
break;
}
}
}
int main (int argc, char *argv[]) {
std::thread t1(foo1);
std::thread t2(foo2);
t1.join();
t2.join();
return 0;
}void wait(unique_lock<mutex>& __lock,_Predicate __p):wait的重载版本,支持根据传入的函数__p的返回值来判断是否执行wait()阻塞,返回值为true则执行wait()阻塞,反之则不执行,当被唤醒时当且仅当函数__p为true时才解除阻塞1
2
3
4
5
6
7
8
9
10
11
12
13
14#include <condition_variable>
//函数源码
template<typename _Predicate>
void
wait(unique_lock<mutex>& __lock, _Predicate __p)
{
while (!__p())
wait(__lock);
}
//支持传入匿名函数
p.wait(ul,[]{return x==0;});cv_status wait_for(unique_lock<mutex>& __lock,const chrono::duration<_Rep,_Period>& __rtime):为wait操作设置一个期限,阻塞期间自动解锁,当在指定时间内被唤醒则返回no_timeout,当超时都未被唤醒返回timeout,wait_for返回后,解除阻塞并加锁1
2
3
4
5
6
7
8
9
10
11
12
13
14
15
16
17
18
19
20
21
22
23
24
25
26#include <condition_variable>
enum class cv_status { no_timeout, timeout };
//函数源码
template<typename _Rep, typename _Period>
cv_status
wait_for(unique_lock<mutex>& __lock,
const chrono::duration<_Rep, _Period>& __rtime)
{
using __dur = typename steady_clock::duration;
return wait_until(__lock,steady_clock::now() +
chrono::__detail::ceil<__dur>(__rtime));
}
//参数
__lock:unqiue_lock对象;
__rtime:持续时间,使用std::chrono对象;
//返回值
成功:no_timeout;
失败:timeout;bool wait_for(unique_lock<mutex>& __lock,const chrono::duration<_Rep,_Period>& __rtime,_Predicate __p):重载的wait_for版本,阻塞时间自动解锁,当在指定时间内被其他线程唤醒并且__p的结果为true或__p为true直接唤醒则函数返回true,当在指定时间内被唤醒,但是__p结果为false则继续阻塞,当超时自动唤醒返回false,wait_for返回后解除阻塞并加锁1
2
3
4
5
6
7
8
9
10
11
12
13
14
15
16
17
18
19
20
21
22
23
24
25
26
27#include <condition_variable>
//函数源码
template<typename _Rep, typename _Period, typename _Predicate>
bool
wait_for(unique_lock<mutex>& __lock,
const chrono::duration<_Rep, _Period>& __rtime,
_Predicate __p)
{
using __dur = typename steady_clock::duration;
return wait_until(__lock,
steady_clock::now() +
chrono::__detail::ceil<__dur>(__rtime),
std::move(__p));
}
//参数
__lock:unqiue_lock对象;
__rtime:持续时间,使用std::chrono对象;
__p:传入一个函数作为判断参数;
//返回值
成功:0;
失败:1;cv_status wait_until(unique_lock<mutex>& __lock,const chrono::time_point<_Clock,_Duration>& __atime):为wait操作设置一个时间点,阻塞期间自动解锁,当在时间点之前被唤醒则返回no_timeout,当超过时间点都未被唤醒返回timeout,wait_until返回后,解除阻塞并加锁1
2
3
4
5
6
7
8
9
10
11
12
13
14
15
16
17
18
19
20
21
22
23
24
25
26
27
28
29
30
31#include <condition_variable>
注:wait_until的_Clock可以直接使用steady_clock和system_clock
//函数源码
template<typename _Clock, typename _Duration>
cv_status
wait_until(unique_lock<mutex>& __lock,
const chrono::time_point<_Clock, _Duration>& __atime)
{
#if __cplusplus > 201703L
static_assert(chrono::is_clock_v<_Clock>);
#endif
using __s_dur = typename __clock_t::duration;
const typename _Clock::time_point __c_entry = _Clock::now();
const __clock_t::time_point __s_entry = __clock_t::now();
const auto __delta = __atime - __c_entry;
const auto __s_atime = __s_entry +
chrono::__detail::ceil<__s_dur>(__delta);
if (__wait_until_impl(__lock, __s_atime) == cv_status::no_timeout)
return cv_status::no_timeout;
// We got a timeout when measured against __clock_t but
// we need to check against the caller-supplied clock
// to tell whether we should return a timeout.
if (_Clock::now() < __atime)
return cv_status::no_timeout;
return cv_status::timeout;
}
//实质上调用了__wait_until_impl转换__Clock类型为steady_clock或system_clock然后再调用wait_untilbool wait_until(unique_lock<mutex>& __lock,const chrono::time_point<_Clock,_Duration>& __atime,_Predicate __P):重载的wait_until版本,阻塞时间自动解锁,当在指定时间点之前被其他线程唤醒并且__p的结果为true或__p为true直接唤醒则函数返回true,当在指定时间点之前被唤醒,但是__p结果为false则继续阻塞,当超时自动唤醒返回false,wait_until返回后解除阻塞并加锁1
2
3
4
5
6
7
8
9
10
11
12
13
14#include <condition_variable>
//函数源码
template<typename _Clock, typename _Duration, typename _Predicate>
bool
wait_until(unique_lock<mutex>& __lock,
const chrono::time_point<_Clock, _Duration>& __atime,
_Predicate __p)
{
while (!__p())
if (wait_until(__lock, __atime) == cv_status::timeout)
return __p();
return true;
}void notify_one():是condition_variable类成员方法,唤醒阻塞在调用该方法的条件变量的线程中的一个线程void notify_all():是condition_variable类成员方法,唤醒阻塞在调用该方法的条件变量的所有线程
注意:以上函数皆是condition_variable类成员函数
线程异步
概念
概念:
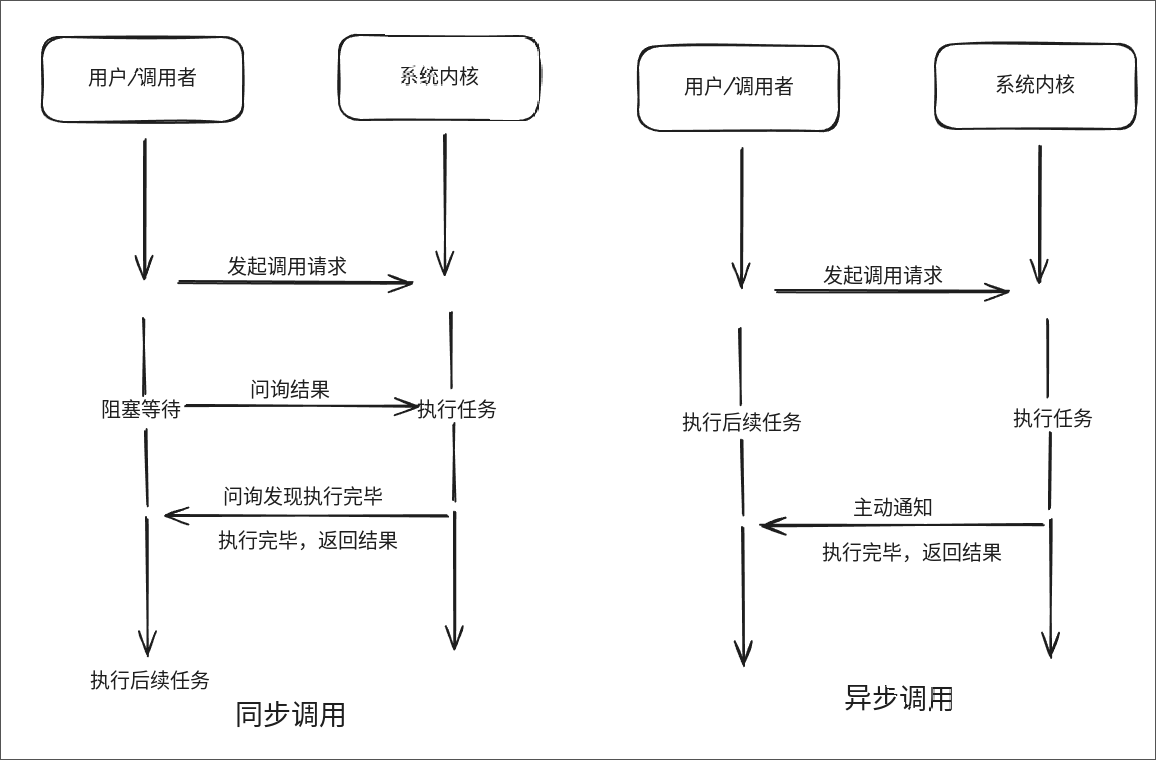
- 多线程是实现异步的手段
异步:当需要执行一个任务时,会立即返回,但是不会立即得到结果,当任务执行完后会通知或者以回调函数方式返回结果。- 例子:当我们网购了一个东西的时候,我们并不会就在那里干等看着快递信息,而是该干嘛干嘛,等待快递到了,快递员通知我们的时候,我们就可以去拿快递并处理
- 应用于长时间执行的任务,避免阻碍主线程执行其他任务。
区别:
- 同步:是只有一条时间线,当我开始执行任务时,需要等待该任务执行完返回结果后才会进行下一个任务
- 异步:开始执行任务时,并不会阻塞等待该任务执行完,而是会继续执行后续任务,当任务结果返回时通知执行者处理
C++异步操作的三种方式:
- std::promise:
- std::packaged_task
- std::async
future
概念:
std::future:是一个类,用来存储异步操作的返回值,提供了获取/访问异步操作结果的机制- C++异步操作三种方式都需要future对象进行存储异步操作结果
问题:
当future对象作为参数传入线程时,一定需要使用move语句原因:因为thread的构造函数是接受一个右值参数,因此需要使用move将左值转为右值,并且不使用move会复制一份
当future对象以引用方式作为参数传入线程时,使用ref语句传入引用原因:避免因为泛型编程的原因导致类型推导偏差,所以需要使用ref传入引用,具体可见关于std::ref函数
注意:建议使用第一种方式,因为使用move是会转移资源使用权,这样就避免出现多个future对象,然后避免误操作多次调用get方法报错
函数原型:
std::future<_Res> __f:future类的构造函数,继承__basic_future类1
2
3
4
5
6
7
8
9
10
11
12
13
14
15
16
17
18
19
20
21
22
23
24
25
26
27#include <future>
//函数源码
template<typename _Res>
typedef __basic_future<_Res> _Base_type;
constexpr future() noexcept : _Base_type() { }
//使用
//定义一个返回值为int型的future对象
std::future<int> __f;
//特性
// 支持移动构造
future(future&& __uf) noexcept : _Base_type(std::move(__uf)) { }
//禁用拷贝构造和拷贝赋值
future(const future&) = delete;
future& operator=(const future&) = delete;
//支持移动赋值
future& operator=(future&& __fut) noexcept
{
future(std::move(__fut))._M_swap(*this);
return *this;
}_Res get():future类的成员函数,阻塞等待获取异步操作的返回值,将结果返回(每个异步操作类都在内部实现存储了一个future对象,只需将其取出即可调用get获取返回值)1
2
3
4
5
6
7
8
9
10
11
12
13
14
15#include <future>
template<typename _Res>
typedef __basic_future<_Res> _Base_type;
_Res
get()
{
typename _Base_type::_Reset __reset(*this);
return std::move(this->_M_get_result()._M_value());
}
//使用
std::future<int> __f;
int a=__f.get();注意:get方法一旦调用一次后,std::future对象的状态就会变为已获取(ready),即不再关联任何异步操作的结果,再次调用则会抛出异常
void wait():等待结果成功返回1
2
3
4
5
6
7
8
9#include <future>
void
wait() const
{
_State_base::_S_check(_M_state);
_M_state->wait();
}future_status wait_for(const chrono::duration<_Rep,_Period>& __rel):设定一个超时时间(持续时间),在持续时间内异步结果返回则函数返回ready,超时还未获得结果则返回timeout1
2
3
4
5
6
7
8
9
10
11
12
13
14
15
16
17
18#include <future>
//函数源码
enum class future_status
{
ready,
timeout,
deferred
};
template<typename _Rep, typename _Period>
future_status
wait_for(const chrono::duration<_Rep, _Period>& __rel) const
{
_State_base::_S_check(_M_state);
return _M_state->wait_for(__rel);
}future_status wait_until(const chrono::time_point<_Clock,_Duration>& __abs):设定一个时间点,在时间点之前异步结果返回则函数返回ready,超过时间点还未获得结果则返回timeout1
2
3
4
5
6
7
8
9
10
11
12
13
14
15
16
17
18
19#include <future?
//函数源码
enum class future_status
{
ready,
timeout,
deferred
};
template<typename _Clock, typename _Duration>
future_status
wait_until(const chrono::time_point<_Clock, _Duration>& __abs) const
{
_State_base::_S_check(_M_state);
return _M_state->wait_until(__abs);
}
promise
概念:
std::promise:异步操作中自由度最高,用于异步传输变量,可以在任务执行的任意时候都能拿到返回值,不是将任务结果返回,而是自定义选择传输结果,std::promise提供存储异步通信的值,再通过其对象创建的std::future异步获得结果void传输:既然是自定义传输,我们也可以选择void也就是不传输,那么std::promise就只起到一个通知作用,不需要关心返回值类型
注:
- 每一个promise对象只能设置一次值,也就是调用一次set_value()
- 可以提前拿出future对象
问题:
当promise对象作为参数传入线程时,一定需要使用move语句原因:因为thread的构造函数是接受一个右值参数,因此需要使用move将左值转为右值,并且不使用move会复制一份
当promise对象以引用方式作为参数传入线程时,使用ref语句传入引用原因:避免因为泛型编程的原因导致类型推导偏差,所以需要使用ref传入引用,具体可见关于std::ref函数
注意:建议使用第一种方式,因为使用move是会转移资源使用权,这样就避免出现多个promise对象,然后避免误操作多次调用set_value方法报错
常用函数以及原型:
std::promise<_Res> ps:std::promise构造函数1
2
3
4
5
6
7
8
9
10
11
12
13
14
15
16
17
18
19
20
21
22
23
24
25
26
27
28
29
30
31
32
33
34
35
36
37
38
39
40#include <future>
//函数源码
template<typename _Res>
typedef __future_base::_State_base _State;
typedef __future_base::_Result<_Res> _Res_type;
//构造函数
promise()
: _M_future(std::make_shared<_State>()),
_M_storage(new _Res_type())
{ }
//析构函数
~promise()
{
if (static_cast<bool>(_M_future) && !_M_future.unique())
_M_future->_M_break_promise(std::move(_M_storage));
}
//特性
//支持移动构造和移动赋值
promise(promise&& __rhs) noexcept
: _M_future(std::move(__rhs._M_future)),
_M_storage(std::move(__rhs._M_storage))
{ }
promise&
operator=(promise&& __rhs) noexcept
{
promise(std::move(__rhs)).swap(*this);
return *this;
}
//禁用拷贝构造和拷贝赋值
promise(const promise&) = delete;
promise& operator=(const promise&) = delete;future<_Res> get_future():获取promise对象内部的future对象1
2
3
4
5
6
7
8
9
10#include <future>
//函数原型
future<_Res>
get_future()
{ return future<_Res>(_M_future); }
//使用
std::promise<int> ps;
auto f=ps.get_future();void set_value(_Res&& __r):设置异步传输值,并存储到内部future对象中1
2
3
4
5
6
7
8
9
10
11
12
13#include <future>
//函数源码
//左值引用
void
set_value(const _Res& __r)
{ _M_state()._M_set_result(_State::__setter(this, __r)); }
//右值引用
void
set_value(_Res&& __r)
{ _M_state()._M_set_result(_State::__setter(this, std::move(__r))); }
使用示例:
1 | |
packaged_task
概念:
std::packaged_task:是一个包装器,用来将函数包装称packaged_task对象,用于异步调用,函数返回值存储在内部future对象中,必须等到任务执行完毕,才能从future对象拿到返回值- 特性:不能自主调用包装的函数(后台运行),需要手动启动包装的函数
问题:
当packaged_task对象作为参数传入线程时,一定需要使用move语句原因:因为thread的构造函数是接受一个右值参数,因此需要使用move将左值转为右值,并且不使用move会复制一份
当packaged_task对象以引用方式作为参数传入线程时,使用ref语句传入引用原因:避免因为泛型编程的原因导致类型推导偏差,所以需要使用ref传入引用,具体可见关于std::ref函数
注意:建议使用第一种方式,因为使用move是会转移资源使用权,这样就避免出现多个packaged_task对象,然后避免误操作多次启动函数,导致future对象get方法不知道取哪个对象的返回值而报错
常用函数以及原型:
std::packaged_task<_Res(_ArgTypes...)> task(_Fn&& __fn):packaged_task构造函数,传入要包装的函数,以及指定函数返回值类型以及参数类型1
2
3
4
5
6
7
8
9
10
11
12
13
14
15
16
17
18
19
20
21
22
23
24
25
26
27
28
29
30
31
32
33
34
35
36
37
38
39
40
41
42
43
44
45
46
47
48
49
50
51#include <future>
//函数源码
template<typename _Res, typename... _ArgTypes>
typedef __future_base::_Task_state_base<_Res(_ArgTypes...)> _State_type;
shared_ptr<_State_type> _M_state;
//构造函数
template<typename _Fn, typename = __not_same<_Fn>>
explicit
packaged_task(_Fn&& __fn)
: _M_state(__create_task_state<_Res(_ArgTypes...)>(std::forward<_Fn>(__fn)))
{ }
template<typename _Signature, typename _Fn,
typename _Alloc = std::allocator<int>>
static shared_ptr<__future_base::_Task_state_base<_Signature>>
__create_task_state(_Fn&& __fn, const _Alloc& __a = _Alloc())
{
typedef typename decay<_Fn>::type _Fn2;
typedef __future_base::_Task_state<_Fn2, _Alloc, _Signature> _State;
return std::allocate_shared<_State>(__a, std::forward<_Fn>(__fn), __a);
}
//析构函数
~packaged_task()
{
if (static_cast<bool>(_M_state) && !_M_state.unique())
_M_state->_M_break_promise(std::move(_M_state->_M_result));
}
//特性
//禁用拷贝构造以及拷贝赋值
packaged_task(const packaged_task&) = delete;
packaged_task& operator=(const packaged_task&) = delete;
//支持移动构造以及移动赋值
packaged_task(packaged_task&& __other) noexcept
{ this->swap(__other); }
packaged_task& operator=(packaged_task&& __other) noexcept
{
packaged_task(std::move(__other)).swap(*this);
return *this;
}
//使用
std::packaged_task<int(int)> task(foo);future<_Res> get_future():获取packaged_task对象内部的future对象1
2
3
4
5
6
7
8
9
10并且不使用move会复制一份#include <future>
//函数源码
future<_Res>
get_future()
{ return future<_Res>(_M_state); }
//使用
std::packaged_task<int(int)> task(foo);
auto f=task.get_future();operator()(_ArgTypes... __args):重载()运算符,用于启动包装的函数1
2
3
4
5
6
7
8
9
10
11
12
13
14#include <future>
//函数源码
void
operator()(_ArgTypes... __args)
{
__future_base::_State_base::_S_check(_M_state);
_M_state->_M_run(std::forward<_ArgTypes>(__args)...);
}
//使用
std::packaged_task<int(int)> task(foo);
task(5);
使用示例:
1 | |
async
概念:
std::async:c++11中异步运行函数,并返回保有其结果的future对象,必须等到任务执行完毕,才能从future对象拿到返回值特性:立即执行:使用launch::async参数调用,async会默认创建线程来运行函数延后执行:使用launch::deferred参数,调用async会延迟执行,直到调用future的get()或者wait()方法时,不会创建线程来执行,而是在当前任务线程阻塞执行
常用函数以及原型:
future<__async_result_of<_Fn,_Args...> std::async(launch __policy,_Fn&& __fn,_Args&&... __args):异步运行函数,支持立即执行以及延后执行(创建线程/不创建线程执行),返回保存函数结果的future对象1
2
3
4
5
6
7
8
9
10
11
12
13
14
15
16
17
18
19
20
21
22
23
24
25
26
27
28
29
30
31
32
33
34
35
36
37
38
39
40
41
42
43
44
45
46
47#include <future>
//函数源码
template<typename _Fn, typename... _Args>
_GLIBCXX_NODISCARD future<__async_result_of<_Fn, _Args...>>
async(launch __policy, _Fn&& __fn, _Args&&... __args)
{
using _Wr = std::thread::_Call_wrapper<_Fn, _Args...>;
using _As = __future_base::_Async_state_impl<_Wr>;
using _Ds = __future_base::_Deferred_state<_Wr>;
std::shared_ptr<__future_base::_State_base> __state;
if ((__policy & launch::async) == launch::async)
{
__try
{
__state = std::make_shared<_As>(std::forward<_Fn>(__fn),std::forward<_Args>(__args)...);
}
#if __cpp_exceptions
catch(const system_error& __e)
{
if (__e.code() != errc::resource_unavailable_try_again
|| (__policy & launch::deferred) != launch::deferred)
throw;
}
#endif
}
if (!__state)
{
__state = std::make_shared<_Ds>(std::forward<_Fn>(__fn),
std::forward<_Args>(__args)...);
}
return future<__async_result_of<_Fn, _Args...>>(std::move(__state));
}
//参数
__async_result_of:函数返回值类型;
__policy:函数行为控制参数,取值为std::launch::async和std::launch::deffered,分别表示立即执行/延后执行;
__fn:异步调用的函数;
__args:函数参数;
//返回值
future对象;
使用示例:
1 | |
原子操作atomic
概念:
std::atomic:是C++11的一个模板类,用于实现多线程环境下的原子操作,提供一种线程安全的方式来访问和修改共享变量,避免多线程中的数据竞争问题原子操作:不可被线程调度机制中断的一个或一系列操作,所以原子操作是一种线程安全的操作特性:- std::atomic相比较普通变量,它的操作是原子性的
- 对原子对象的访问可以做到线程同步,避免了使用锁的复杂性
- 禁止复制、移动
常用函数以及原型:
std::atomic<_ITp> data:创建一个原子对象1
2
3
4
5
6
7
8
9
10
11
12#include <atomic>
//函数源码
template<typename _ITp>
//继承了__atomic_base模板类,atomic又对各类型特化进行实现
atomic() noexcept = default;
//禁止复制以及移动
atomic(const atomic&) = delete;
atomic& operator=(const atomic&) = delete;
atomic& operator=(const atomic&) volatile = delete;__int_type load():将原子变量的值加载到当前线程的本地缓存中,并将这个值返回1
2
3
4
5
6
7
8
9
10
11
12
13
14
15
16
17
18
19
20
21
22
23
24#include <atomic>
//函数源码
template<typename _ITp>
typedef _ITp __int_type;
_GLIBCXX_ALWAYS_INLINE __int_type
load(memory_order __m = memory_order_seq_cst) const noexcept
{
memory_order __b __attribute__ ((__unused__))
= __m & __memory_order_mask;
__glibcxx_assert(__b != memory_order_release);
__glibcxx_assert(__b != memory_order_acq_rel);
return __atomic_load_n(&_M_i, int(__m));
}
//使用
std::atomic<int> data=0;
int x=data.load();
printf("x=%d\n",x);
//打印结果为0void store(__int_type __i):将__i值存储到atomic变量中,是原子性操作1
2
3
4
5
6
7
8
9
10
11
12
13
14
15
16
17
18
19
20
21
22
23
24
25#include <atomic>
//函数原型
template<typename _ITp>
typedef _ITp __int_type;
_GLIBCXX_ALWAYS_INLINE void
store(__int_type __i, memory_order __m = memory_order_seq_cst) noexcept
{
memory_order __b __attribute__ ((__unused__))
= __m & __memory_order_mask;
__glibcxx_assert(__b != memory_order_acquire);
__glibcxx_assert(__b != memory_order_acq_rel);
__glibcxx_assert(__b != memory_order_consume);
__atomic_store_n(&_M_i, __i, int(__m));
}
//使用
std::atomic<int> x=0;
x.store(1);
printf("x=%d\n",x.load());
//打印结果为1__int_type exchange(__int_type __i):将__i值替换atomic变量旧值,将旧值返回1
2
3
4
5
6
7
8
9
10
11
12
13
14
15
16
17
18
19
20#include <atomic>
//函数源码
template<typename _ITp>
typedef _ITp __int_type;
_GLIBCXX_ALWAYS_INLINE __int_type
exchange(__int_type __i,
memory_order __m = memory_order_seq_cst) noexcept
{
return __atomic_exchange_n(&_M_i, __i, int(__m));
}
//使用
std::atomic<int> x=0;
int y=x.exchange(1);
printf("y=%d\n",y);
printf("x=%d\n",x.load());
//打印结果为y=0,x=1bool compare_exchange_weak(__int_type& __i1,__int_type __i2):比较atomic变量的值与__i1的值,如果相同,则将__i2的值存储到atomic变量中,并返回true,如果不相同,则将atomic的值存储到__i1中,并返回false1
2
3
4
5
6
7
8
9
10
11
12
13
14
15
16
17
18
19
20
21
22
23
24
25
26
27
28
29
30#include <atomic>
//函数源码
_GLIBCXX_ALWAYS_INLINE bool
compare_exchange_weak(__int_type& __i1, __int_type __i2,
memory_order __m = memory_order_seq_cst) noexcept
{
return compare_exchange_weak(__i1, __i2, __m,
__cmpexch_failure_order(__m));
}
//使用
std::atomic<int> x=0;
int y=1;
x.compare_exchange_weak(y,-1);
printf("不相等:\n");
printf("y=%d\n",y);
printf("x=%d\n",x.load());
x.compare_exchange_weak(y,-1);
printf("相等:\n");
printf("y=%d\n",y);
printf("x=%d\n",x.load());
//打印结果:
不相等:
y=0
x=0
相等:
y=0
x=-1
线程池
概念:
线程池:顾名思义就是一个放线程的池子(线程聚集的地方),里面有很多线程,用于管理程序的线程创建与销毁回收的,会在程序开始时创建一堆线程- 线程池是一个符合生产者消费者模型的一个应用,因此我们实现时就按照这种架构思想实现
- 具体线程池概念可见Linux网络编程—线程池
Threadpool.h
1 | |
Threadpool.cpp
1 | |